Posted by LaunchpadOne Team
Now that you're publishing your podcast, a great next step is to market your show to new and existing listeners on your social media channels. LaunchpadOne has partnered with Headliner to give you an easy way to create video and audiograms for your podcast to promote on social media!
You can watch this short video to find out more about Headliner:
Here's how you can use Headliner on LaunchpadOne:
Select An Episode - The Headliner tool is available for existing or newly published episodes. For a review on how to publish an episode of your show, you can read more here.
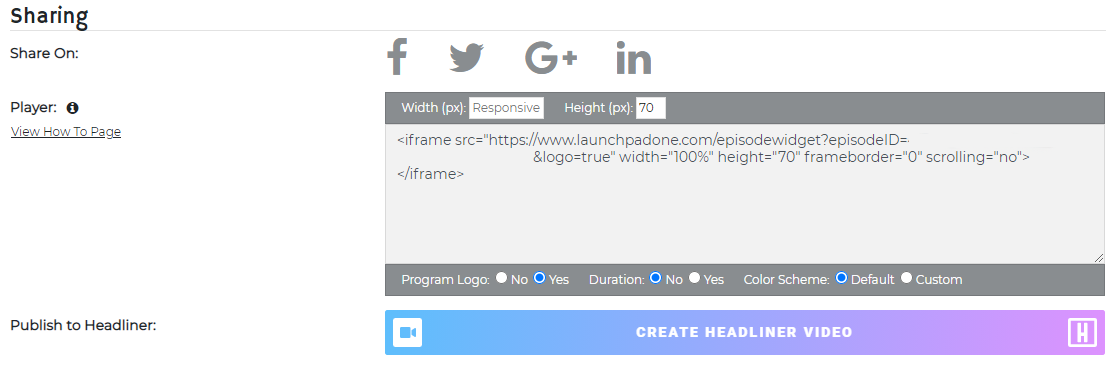
Publish to Headliner - Once your episode is published, in the Sharing section at the bottom of the episode page, select the Create Headliner Video button:
Select Your Aspect Ratio - for the clip you're creating, select how you'd like it to look. You can choose:
Read More
Now that you're publishing your podcast, a great next step is to market your show to new and existing listeners on your social media channels. LaunchpadOne has partnered with Headliner to give you an easy way to create video and audiograms for your podcast to promote on social media!
You can watch this short video to find out more about Headliner:
Here's how you can use Headliner on LaunchpadOne:
Select An Episode - The Headliner tool is available for existing or newly published episodes. For a review on how to publish an episode of your show, you can read more here.
Publish to Headliner - Once your episode is published, in the Sharing section at the bottom of the episode page, select the Create Headliner Video button:

Select Your Aspect Ratio - for the clip you're creating, select how you'd like it to look. You can choose:
-
Landscape - best for YouTube and websites
-
Square - best for Twitter, Instagram and Facebook
-
Portrait - is best for Instagram Stories, Snapchat and TikTok
Clip Audio - using the Headliner editor tool, select the section of your episode that you want included
Customize - make your video look the way you want with the included options or create your own templates:
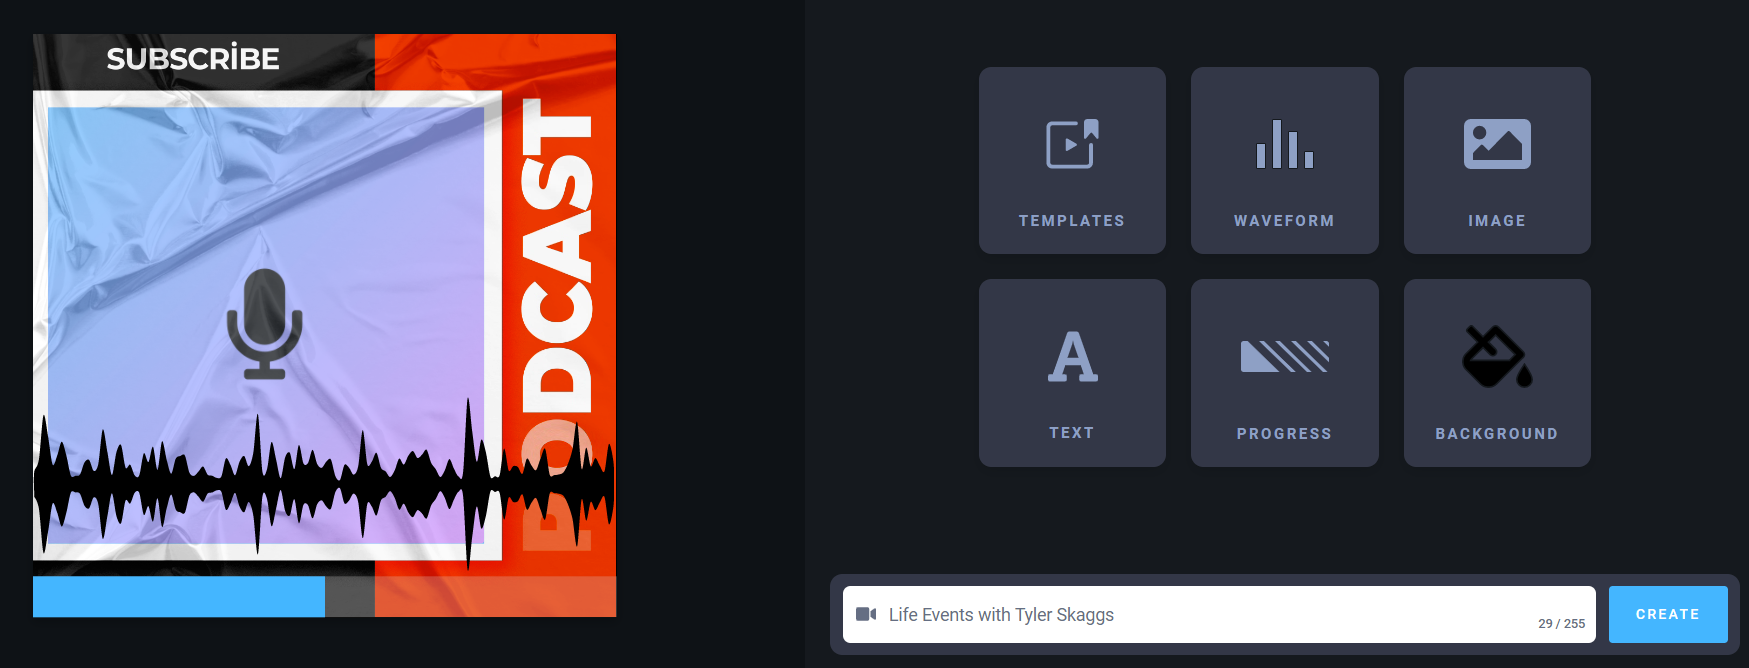
Export - Export your video and upload to your social media channels!
For more detailed instructions on how to use headliner and create fantastic audiograms, you can see guides on Headliner here. Show Less
|
|
Posted by LaunchpadOne Team
Thank you for joining LaunchpadOne. Before you go, please drop us a line at contact@launchpadone.com and let us know if there's features we can improve! If you have decided to change hosting services, please make sure your new feed is set up prior to shutting down your LaunchpadOne account. Once that is ready, follow the steps below to close and/or redirect your account:
- Click the avatar icon in the top right-hand corner of the LaunchpadOne dashboard.
- Select "Close Your Account."
- On the account closure page, you will have an option to let us know why you're leaving and to set up a redirect to a new hosting platform.

- Insert your new RSS feed into the provided field and click "Close My Account" to complete the redirect.
- Remember, creating a redirect is a permanent process that cannot be undone and your account with LaunchpadOne will be closed upon redirecting.
Thank you for joining LaunchpadOne. Before you go, please drop us a line at contact@launchpadone.com and let us know if there's features we can improve! If you have decided to change hosting services, please make sure your new feed is set up prior to shutting down your LaunchpadOne account. Once that is ready, follow the steps below to close and/or redirect your account:
- Click the avatar icon in the top right-hand corner of the LaunchpadOne dashboard.
- Select "Close Your Account."
- On the account closure page, you will have an option to let us know why you're leaving and to set up a redirect to a new hosting platform.

- Insert your new RSS feed into the provided field and click "Close My Account" to complete the redirect.
- Remember, creating a redirect is a permanent process that cannot be undone and your account with LaunchpadOne will be closed upon redirecting.
Show Less
|
|
Posted by LaunchpadOne Team
Distributing Your Podcast To Listening PlatformsOnce you've set up your new podcast and uploaded episodes, you'll need to make them available to listeners! Here are simple instructions on distribution options to grow your audience so that you have direct ownership of your accounts on these platforms. Note: before you proceed with distribution, ensure that your podcast has a published episode (or trailer/promo) and uploaded artwork in LaunchpadOne to meet distributors submission requirements.
The Podcasts app by Apple is one of the more utilized podcasting apps in the market. To be published in this highly used platform, it is important to go through the validation process for submission. To learn more about the iTunes submission process, please see here. Please see here to start the podcast validation and submission process.
Adding your podcast to Spotify gives your brand access to millions of listeners in 60 markets across desktop, Android, and iOS devices. To view helpful information on getting your podcast submitted to Spotify for Podcasters, please see here. Please see here to submit your podcast to Spotify for Podcasters. 
Google Podcasts - Instructions | Submit Your PodcastWhen your podcast is "on Google," listeners can find and play your podcast on many different Google services: in the browser with a Google search, in the Google Podcasting App for Android or iOS, or on many other Google services. Sign up for Google Podcast Manager with an existing Google account and add the RSS feed for validation.
To submit your podcast, get started here. Pandora - Instructions | Sign Up
Submitting your podcast with Pandora will continue to expand your audience and listenership. Podcasters can grow their audience and potentially monetize while benefiting from their "Podcast Genome Project" that recommends shows to the right listeners on the platform. Here is a helpful FAQ. Register with Pandora and begin using Pandora for Podcasters here. Amazon - Submit Your Podcast
Amazon Music is a large on-demand streaming music platform, tightly integrated with the Alexa ecosystem and Audible, their audiobook service. Enabling your content to be distributed on Amazon Music and Audible allows you to grow your audience by reaching these customers, many of whom will be new to podcasting.
See here to start submitting your podcast.
Stitcher - Submit Your PodcastSimilar to other podcast platforms, if you wish to have your podcast listed on the Stitcher directory, it is required to go through the validation process for approval. To initiate the validation process, you need to first become a partner. See here to get the Stitcher partner process started and submit your podcast.
TuneIn offers more than 50,000 radio stations and 120,000 shows from around the globe. With its listenership ranging from podcast and radio listeners, it uniquely provides two different audience types for content housed in their library. See here to submit your podcast for consideration to be listed in their library. iHeartRadio is a platform that provides Live Radio, Artist Radio, and Podcasts to its listenership. See here for details on how to submit your podcast. To submit your podcast, please visit this page.  Each platform has similar steps for submission and validation, and when you're available on the platforms a user prefers, you can start growing your audience!
|
|
Posted by LaunchpadOne Team
To share your content on your personal website or blog, LaunchpadOne offers embeddable players for you to use. This are two options for you across the site, single episode players and show playlist players. This will cover single episode players. To learn about show playlist players, please see this article.
- Click the "Your Episodes" tab, and select the episode you'd like to embed under "Recent Episodes."
- In the "Sharing" Section, you will find HTML code for an embeddable player:
 You can customize the following fields:
- Width and Height - these are editable in pixels. By default, the width is responsive, so it will fill 100% of the width of the site or iFrame.
- Program Logo - you can toggle this on or off
- Duration - this is final episode duration, you can toggle this on or off too
- Color Scheme - you can go with the default color scheme, as pictured above, or select custom color scheme to edit the player:
Read MoreTo share your content on your personal website or blog, LaunchpadOne offers embeddable players for you to use. This are two options for you across the site, single episode players and show playlist players. This will cover single episode players. To learn about show playlist players, please see this article.
- Click the "Your Episodes" tab, and select the episode you'd like to embed under "Recent Episodes."
- In the "Sharing" Section, you will find HTML code for an embeddable player:
 You can customize the following fields:
- Width and Height - these are editable in pixels. By default, the width is responsive, so it will fill 100% of the width of the site or iFrame.
- Program Logo - you can toggle this on or off
- Duration - this is final episode duration, you can toggle this on or off too
- Color Scheme - you can go with the default color scheme, as pictured above, or select custom color scheme to edit the player:
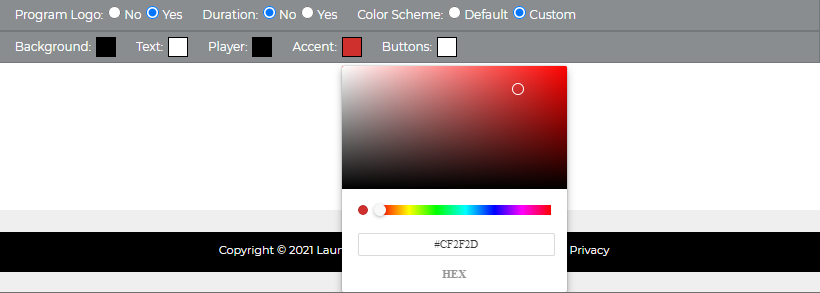
- You can customize Background, Text, Player, Accent and Button colors, and will see a preview below with your changes prior to saving.
Once you've finished making your selections, copy and paste the embed code into your website! Show Less
|
|
Posted by LaunchpadOne Team
Create Episode
From the "Episodes" Tab, click the "Publish an Episode" button to begin creating your episode. 
Episode Details
Fill out the following on the Episode Details page:
- Title - Fill in the episode title. Make your title specific to attract subscribers.
- Description - Include a few sentences to describe your episode.To enter a line break in the episode Description, click the HTML option. Then, press Shift + Enter or click the "BR" button to add a line break.
- To create a new paragraph in the episode Description, click the HTML option. Then, press Enter or click the "P" button to begin a new paragraph.
- As far as what actually gets sent to iTunes for the Description, we send it both with HTML (if it contains any) and with all HTML stripped out. All podcatchers including iTunes typically strip out all HTML, which is why we send the stripped out version. However, starting with iOS 11, iTunes does
Read More
Create Episode
From the "Episodes" Tab, click the "Publish an Episode" button to begin creating your episode. 
Episode Details
Fill out the following on the Episode Details page:
- Title - Fill in the episode title. Make your title specific to attract subscribers.
- Description - Include a few sentences to describe your episode.To enter a line break in the episode Description, click the HTML option. Then, press Shift + Enter or click the "BR" button to add a line break.
- To create a new paragraph in the episode Description, click the HTML option. Then, press Enter or click the "P" button to begin a new paragraph.
- As far as what actually gets sent to iTunes for the Description, we send it both with HTML (if it contains any) and with all HTML stripped out. All podcatchers including iTunes typically strip out all HTML, which is why we send the stripped out version. However, starting with iOS 11, iTunes does now accept the HTML version as well, but it only renders the HTML in the Apple Podcasts app. Within iTunes itself, it strips out the HTML.
Media
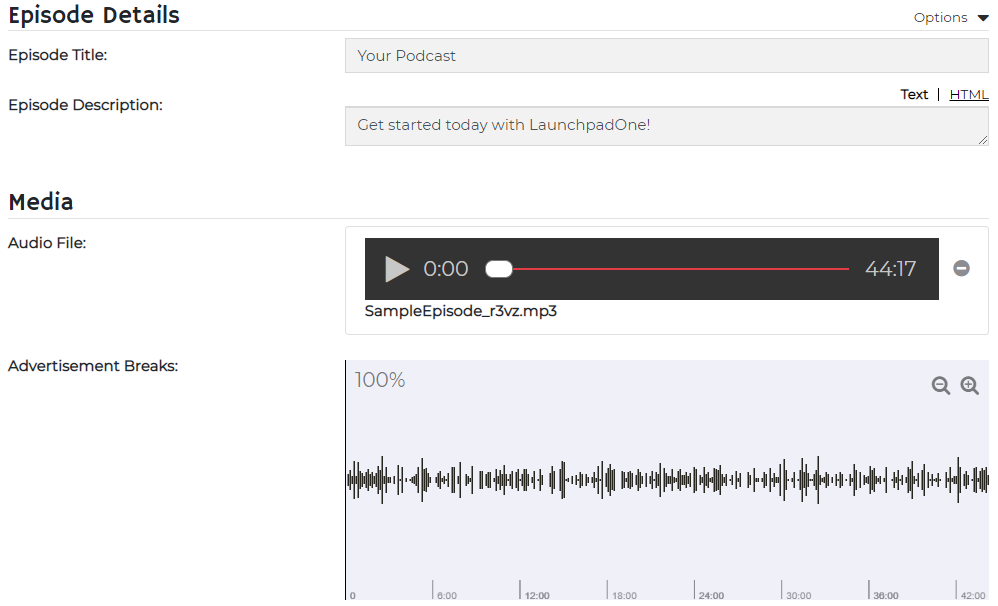
- Audio - Drag the file you wish to upload into the gray "Drag file here to upload" box, or click the "Select a File" button to select the file to upload.
- Upload an MP3 file. Your file must be in mp3 format.
- Upon successful upload, the uploading progress bar changes to a waveform where you can preview the file.
- Insert a mid-roll break using the "Insert Ad Spots" button or delete them by clicking the circle button on the right side of the listed ad spot. In order to publish, you must insert at least one mid-roll break.
Publishing
- iTunes Release Date - The date that will appear as the release date in iTunes.
- Expire - When your episode should be removed from the website, app, and iTunes/podcatchers.
- This is set to "Never Expire" by default.
- Click "Set Date" to set a specific time/date for removal.
Metadata
- Duration - Type in the total runtime of the episode.
- Add 2 minutes to the total runtime to account for digitally inserted ads.
- Rating - Select "Clean" or "Explicit" depending on the nature of your episode.
To publish right away, click " Publish Episode." If you wish to finish publishing it at a future time, click the Save As Draft" link to save the episode as a draft.
- Successful creation of the episode will show you:
- A new page with a message notifying you of its success and your episode listed in Recent Episodes.
- A Final Episode Media player under your segment preview players in the Media section.
- An episode ID in the Episode Summary box in the right column.
- Unsuccessful creation of the episode will show you:
- A red message at the top of the page, notifying you of the error(s) preventing successful episode creation.
- A message at the top of the page notifying you if it was able to save the episode as a draft.
- Highlights on any required fields that were not filled in.
- If your error isn't an issue of unfilled elements or the red error message is not clear, contact customer service for assistance.
To finish publishing at a later time, click the " Save As Draft" link to save the episode as a draft. With that, your episode is all set for publishing! To distribute your show across platforms like Apple Podcasts, Spotify, etc., please see the article about Distributing Your Podcast. Show Less
|
|
Posted by LaunchpadOne Team
Getting started with a podcast is easy with LaunchpadOne, and you can either create a brand new podcast, or ingest an existing podcast for rehosting and new distribution. Check out below for how to do both: Setting Up Your Account
- Select "Start Podcasting" to begin your account setup here, and fill out your account details
- Verify your email address with the code provided and log in to LaunchpadOne to see the screen below:

Creating A New Podcast
- Select "Create a New Podcast" and fill out the sections listed below:
- Program Details
- Fill in the Title and Description
- To enter a line break in the Description field, click the HTML option. Then, press Shift + Enter or click the "BR" button
- To create a new paragraph in the Description field, click the HTML option. Then, press Enter to begin a new paragraph.
- iTunes Show Type - select Episodic or Serial
- Episodic (default) - Specify episodic for stand-alone
Read MoreGetting started with a podcast is easy with LaunchpadOne, and you can either create a brand new podcast, or ingest an existing podcast for rehosting and new distribution. Check out below for how to do both: Setting Up Your Account
- Select "Start Podcasting" to begin your account setup here, and fill out your account details
- Verify your email address with the code provided and log in to LaunchpadOne to see the screen below:

Creating A New Podcast
- Select "Create a New Podcast" and fill out the sections listed below:
- Program Details
- Fill in the Title and Description
- To enter a line break in the Description field, click the HTML option. Then, press Shift + Enter or click the "BR" button
- To create a new paragraph in the Description field, click the HTML option. Then, press Enter to begin a new paragraph.
- iTunes Show Type - select Episodic or Serial
- Episodic (default) - Specify episodic for stand-alone episodes or when you want your episodes presented and recommended newest-to-oldest. This option also supports seasons, with the newest episode at the top. For new subscribers, Apple Podcasts adds the latest, most recent episode in their Library
- Serial - Specify serial when you want your episodes presented and recommended oldest to newest. This option supports narratives, storytelling, thematic, and multiple seasons. For new subscribers, Apple Podcasts adds the first episode to their Library, or the entire current season if using seasons.
- Select an iTunes Category and any Subcategories from the dropdown to give your podcast the widest possible reach of subscribers.
- Status - Leave the dropdown as Active
- This is set to "Active" by default.
- Select "Inactive" to remove your podcast from public view.
- Host - Type in the host name.
- Rating - Select "Clean" or "Explicit" depending on the nature of your show or episode.
- Podcast Author Name - Fill in the name you want to appear as the producer/publisher of the podcast.
- Podcast Author Email - Fill in the email address that you want associated with any and all communication and accounts in connection with your podcast.
- Program Image
- Drag your file into the Program Image box, or click the "Select a File" button to upload the artwork.
- Artwork file must be in the JPEG or PNG file formats and in the RGB color space with a minimum size of 1400 x 1400 pixels and a maximum size of 3000 x 3000 pixels at 72 DPI.
- Publishing
- Language - Select your language.
- Add Podtrac Prefix - Enter your Podtrac prefix URL, if applicable.
- Add Blubrry Prefix - If you have a Blubrry Prefix, select the box and enter your Blubrry prefix URL.
- Click the "Create Program" button near the bottom of the page.
- Upload your first episode and distribute your RSS Feed to the channels of your choice!
Importing an Existing Podcast
- Once you've entered your account details, select "Import a Podcast".
- Enter the podcast RSS feed URL on the next page and click the "Import" button.
- Successful creation of the imported podcast will show you a green message that it has been successfully created and the number of episodes imported successfully.
- Unsuccessful creation of the imported podcast will show you a red message notifying you of the error(s) preventing the import of your podcast or episode(s). Contact support for assistance.
- Once all episodes are ingested, complete a 301 redirect from your previous hosting platform and begin publishing your new episodes on LaunchpadOne
Show Less
|
|
|
|